
Set Review ➟ LEGO® 10321 Corvette

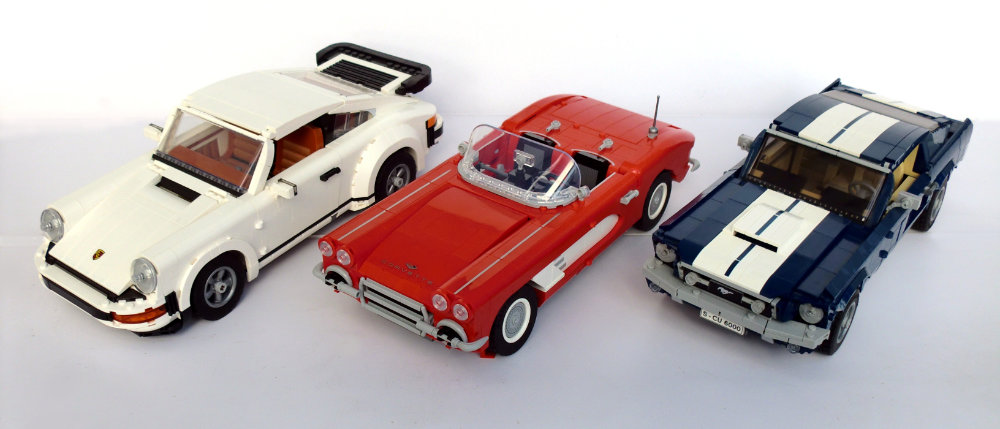
If there’s one thing Lego produces well, and often, it’s large-scale car models. From Model Team, Racers, Creator Expert, and now the Icons range, the level of detail, accuracy, and functionality has consistently improved over the years, bringing us true masterpieces such as the 10265 Ford Mustang, 10295 Porsche 911, and most recently the 10317 Land Rover Defender. Unfortunately, prices have also been increasing, and the smaller Speed Champions line-up has arguably been offering better value, with detailed and accurate licensed models which introduce useful new parts and advanced building techniques at a more affordable price point. At NZ$280 (£129.99 / US$149.99 / 149.99€), Lego’s latest iconic vehicle is the 1961 Chevrolet C1 Corvette. This set contains 1210 pieces and releases on August 4th. Let’s see if it can deliver on accuracy and functions to earn its place among the pantheon of iconic Lego vehicles.
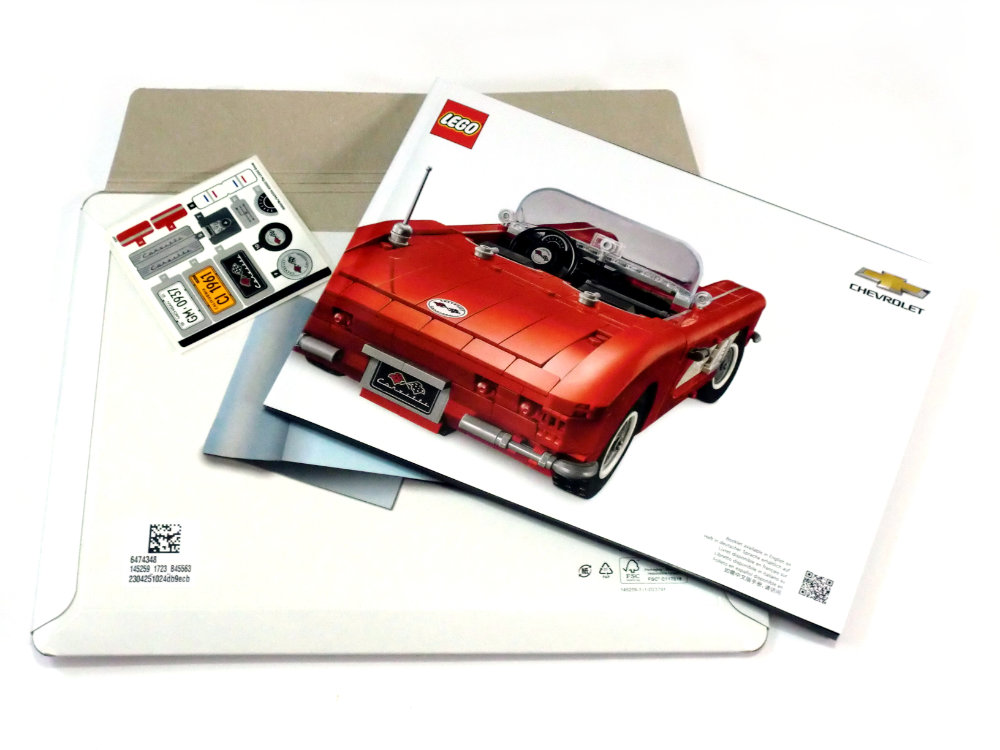
Box & Contents
The box art features a very nice photo of the car in its striking red and white colour scheme. The Chevrolet logo is there, though the set name itself is simplified to just “Corvette” (contrasting with past licensed products, such as last year’s 76909 Mercedes SC double pack). The rear of the box shows off the hard-top option, opening functions, and a photo of the real car.
Opening it up, the set contains nine numbered bags - one per building stage - an additional bag for the tires, a cardboard sleeve protecting the instruction booklet and sticker sheet, plus protective paper packaging for the two new windscreen elements. While my box itself was a bit damaged in transit, I have to commend Lego for getting the internal protective packaging right to prevent crumpled instructions and stickers, or scratched up windscreens.

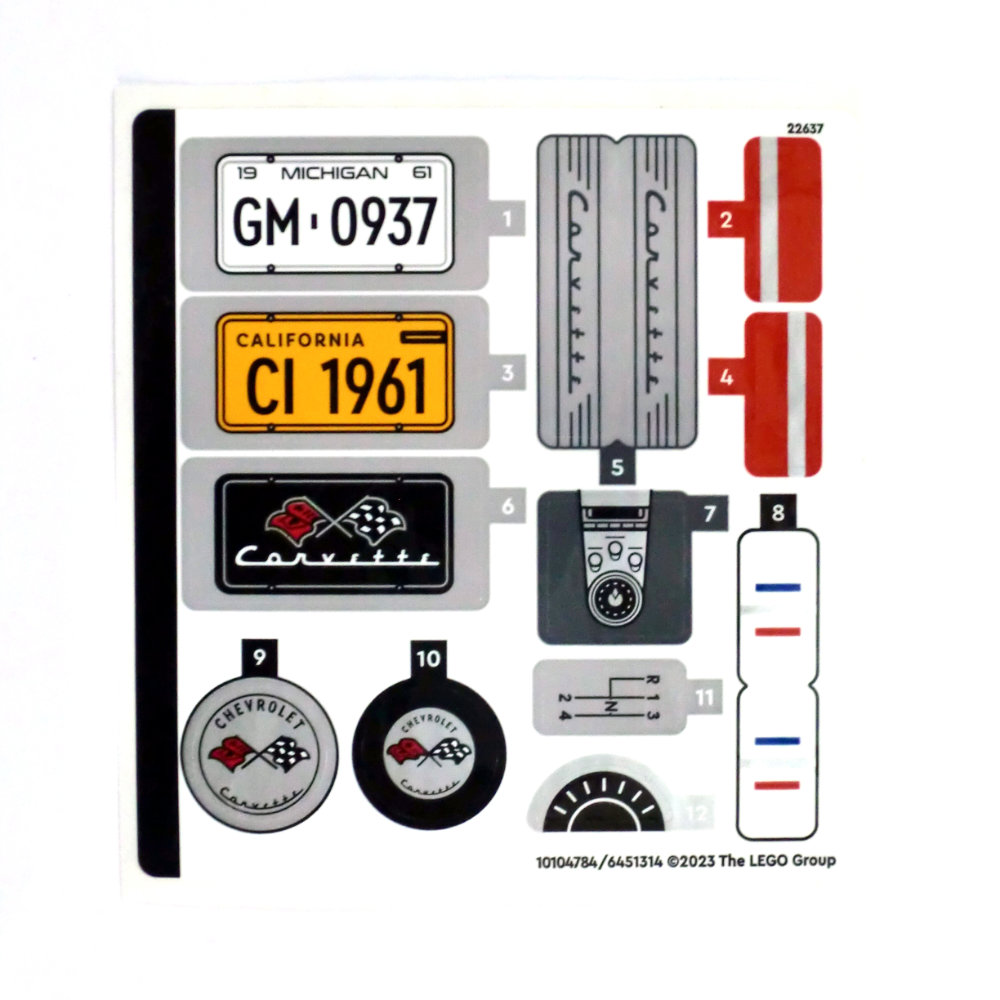
Unfortunately there is still a sticker sheet, though printed elements provide almost all essential decorated details. The stickers are all pretty optional here, with one exception, and in the following pictures I have chosen not to apply them. Stickers [1][3][6] are number plate options, [5] applies to the engine, [7][11][12] provide interior detail, [9][10] apply to the boot lid and steering wheel respectively, [8] applies to the side panels in front of each door, and [2][4] complete the silver striping between the seats.
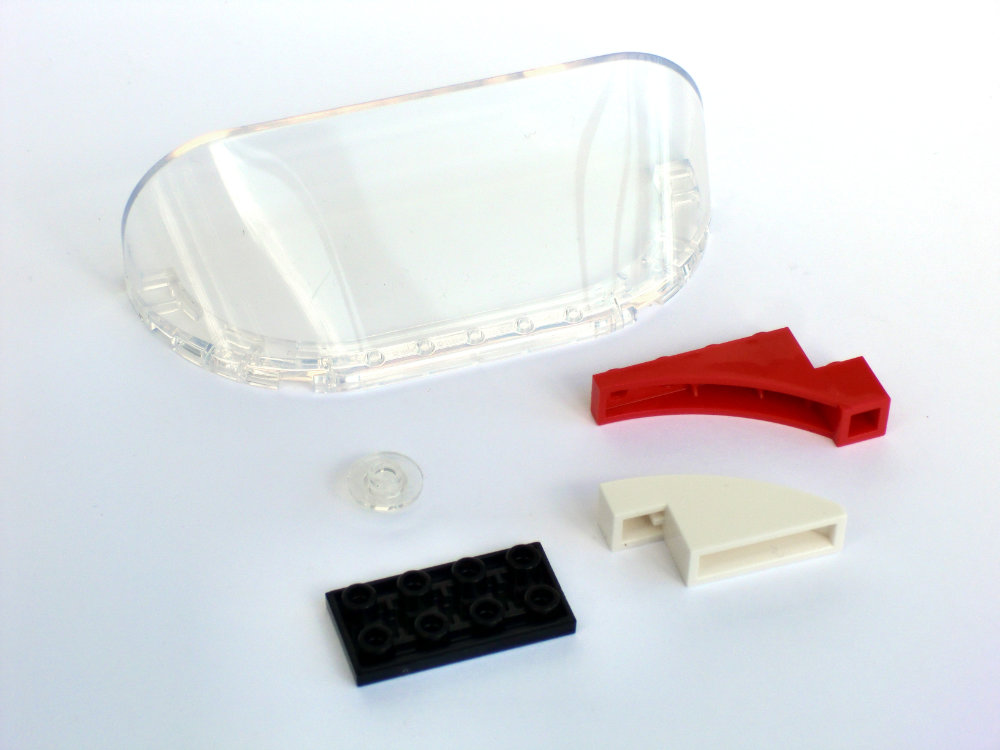
The curved 12x4x3 windscreen (x2 in set) is a brand new element, created specifically for this set. Also new here are matching curved and arched elements used in the doors (x2 of each), the new 2x4 inverted tile in Black (x18), and a great new 1x1 headlight element (x5) (just like a 1x1 round plate, but with an extended brim, measuring 1.5 studs in diameter).
New elements
Printed elements
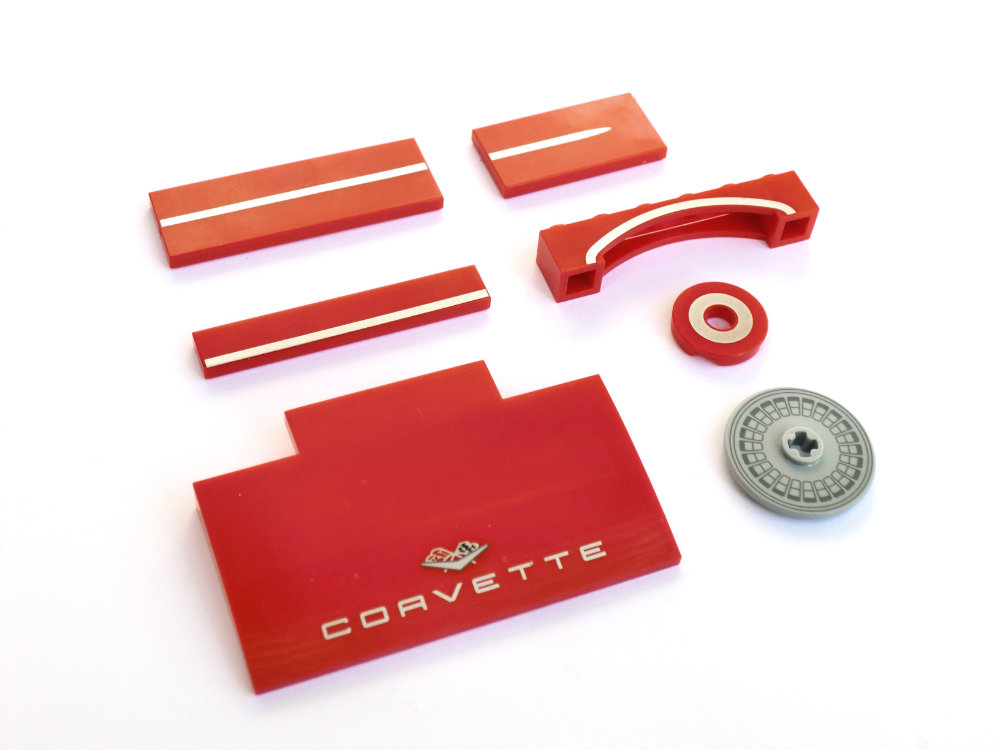
Six silver-printed elements are featured, including a Corvette-branded 5x8 curved slope previously used as ramps for City road plates (a second unprinted red version is also used in the set). The silver printing is of high quality and all prints were well-aligned/centered. The printed 3x3 Technic disk (x4) is also a very nice and useful part, though darker printing might have been better here for contrast.
Build Process
The building instructions contain some background information on the real car, a graphic showing the evolution of the Corvette from the 1953-62 C1 to the 2020 C8 model, and a note from set designer Rok Žgalin Kobe promising a unique frame and interesting steering linkages in the upcoming build.
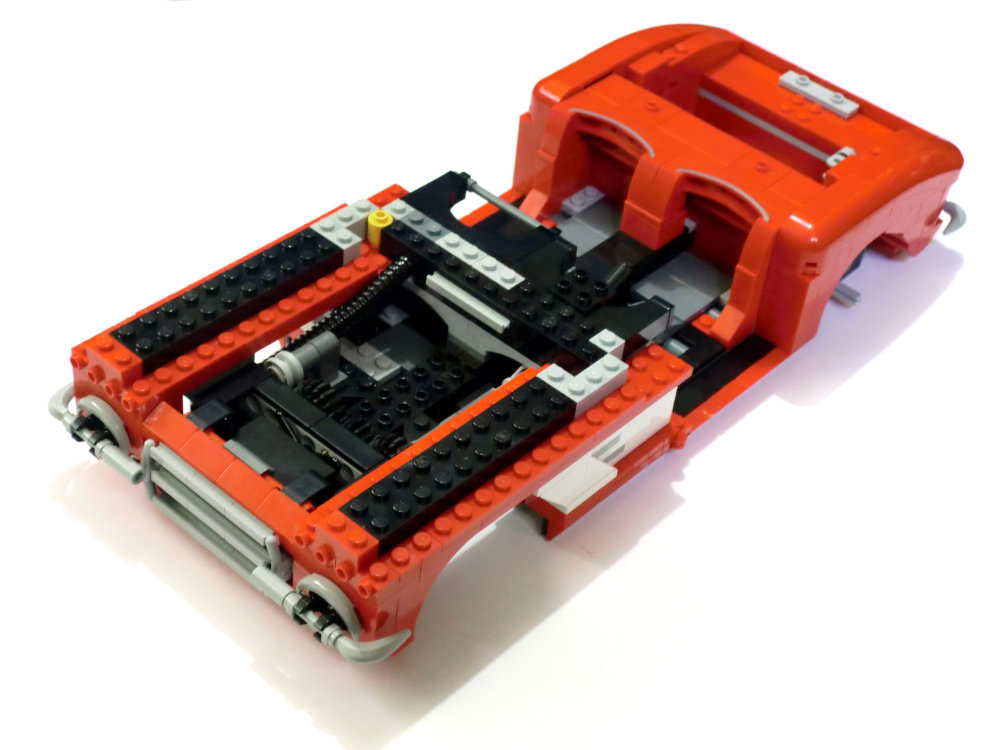
Stage #1 builds the chassis frame and solid rear axle, using Technic open-center bricks for rigidity (essential for a roofless convertible), and a combination of #32000 Technic bricks and #11458 modified plates to achieve a half-plate offset along each side. Stage #2 then tiles up the underside of the chassis (with all of the new 2x4 inverted tiles), and adds the lower side running boards plus a strong central Technic-brick spine.
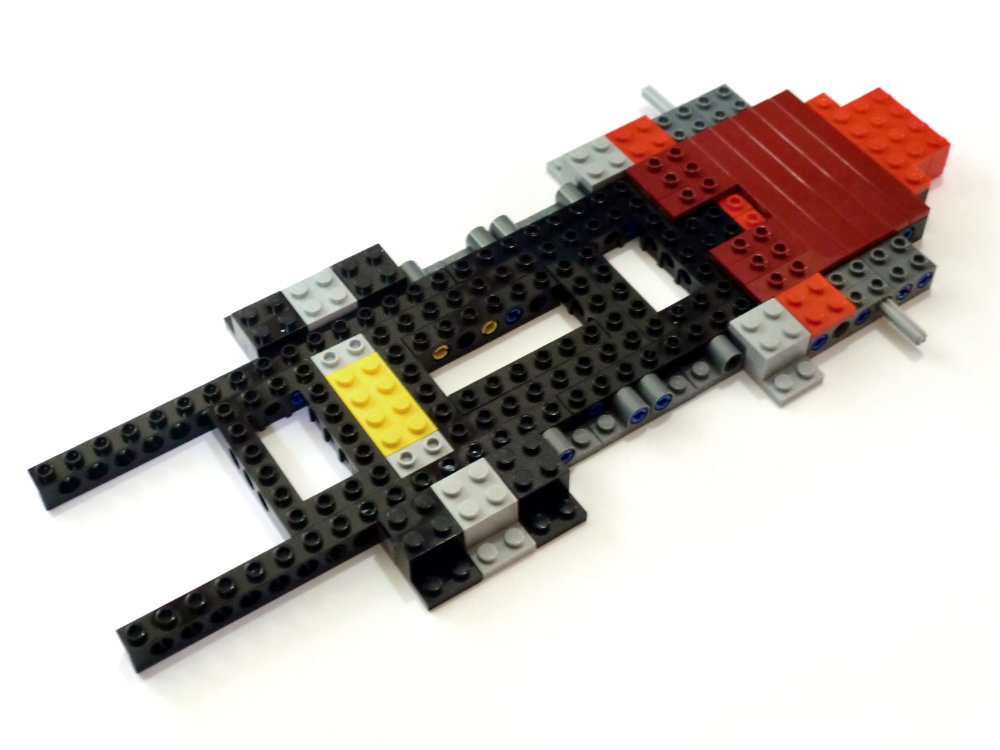
Stage #1
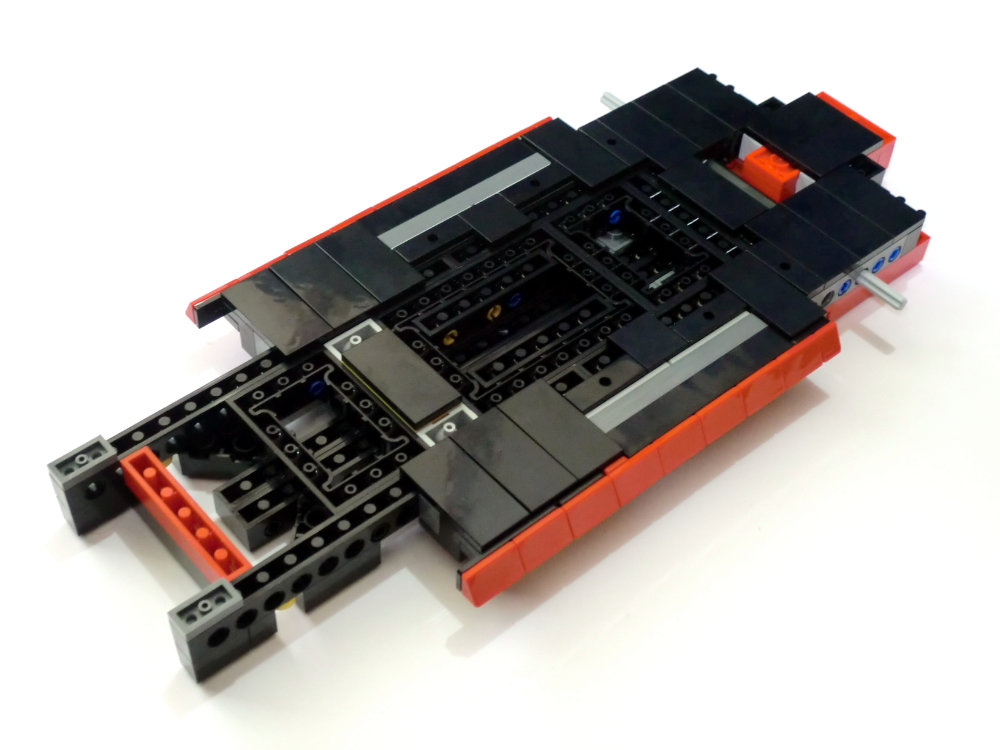
Stage #2 (inverted)
Stage #3 builds up the rear boot area and rear bumper. Some clever SNOT techniques are utilized in the bumper assembly, and Bionical 1x1 dome ‘eyes’ are used for the iconic round tail-lights. An interesting mechanism is also installed to the rear-left of the boot space - can you guess yet what this might be for?
Stage #4 builds up the rear fenders and rear quarter panels. The latter are attached in a very satisfying way, clipping onto double-clips then sliding upwards to connect with inverted studs - my favorite part of the whole build. The rear shaping here is excellent, and would almost feel like cheating if the specialized parts here (large curved elements #77180/82, and curved wedge bricks #80177/78) had not already been introduced and re-used in multiple previous sets. The number plate is also added in this stage, and while three alternate tiles and stickers are provided, this is the one stickered area that I feel really should have been printed - we got great printed number plates for the Porsche 911, so why not here?
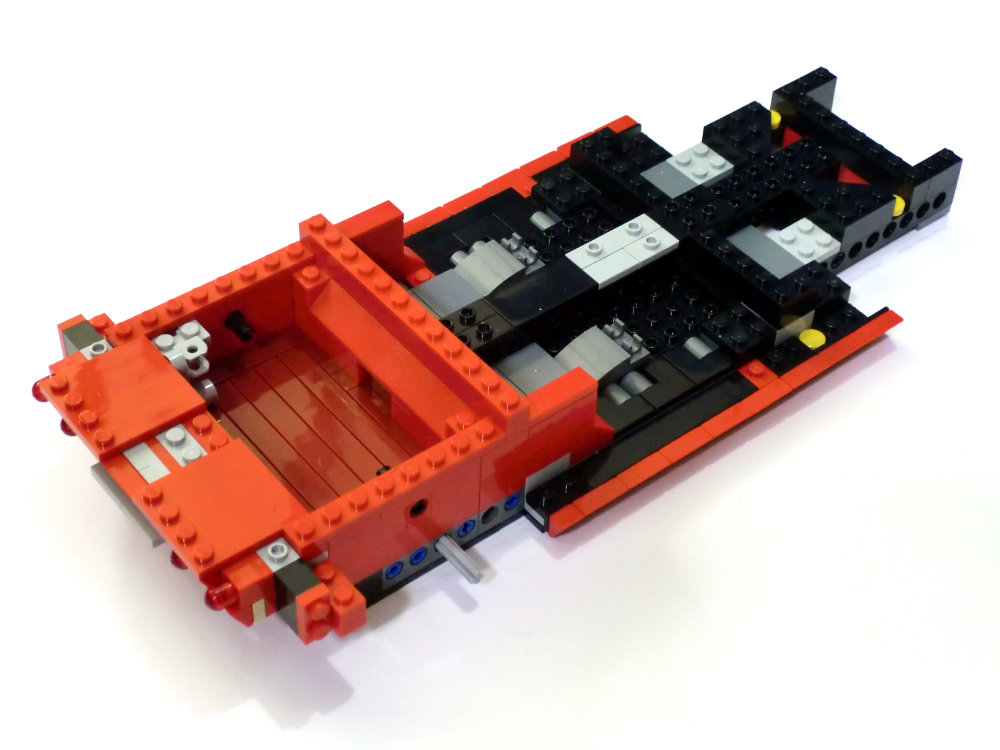
Stage #3
Stage #4
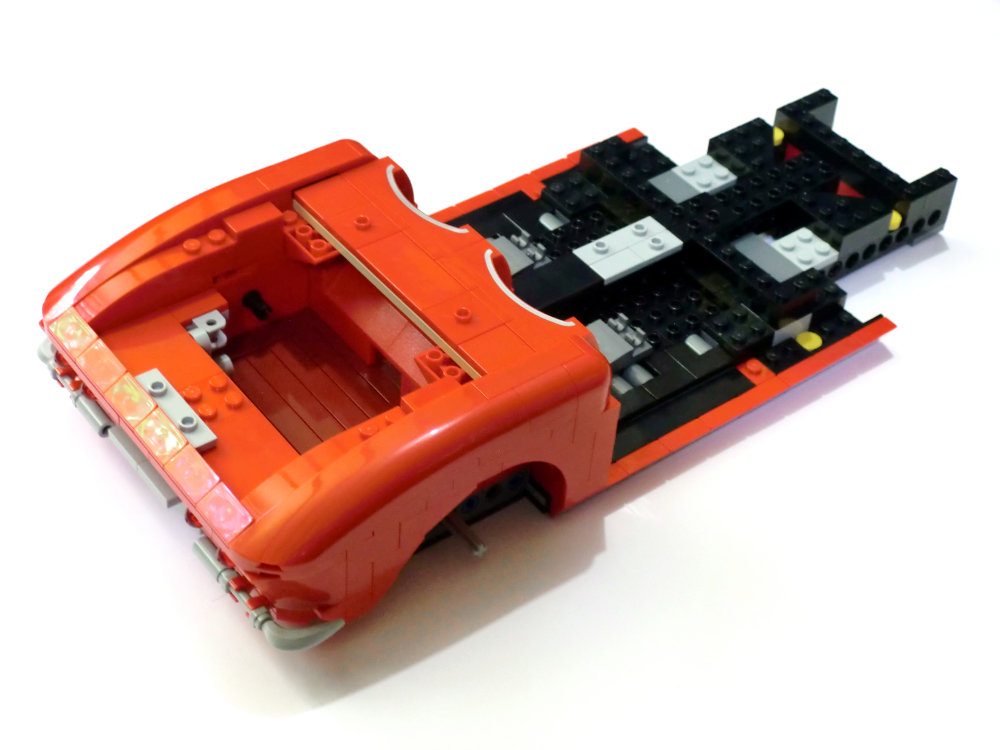
Stage #5 builds the dashboard, steering mechanism, and mid-side panels. There are some excellent building techniques used in the dashboard assembly, with its classic semi-circular recesses. I have one nitpick here though, which is that the central foot-pedal lacks any stopper to keep it aligned with the outer two pedals. This can easily be fixed by adding a #18654 Technic 1x1 liftarm/spacer at Step 139 (of which a spare in DBG is already included in the set). The gear shifter is also added here, confusingly next to what appears to be the stickered shifting gate, but which actually represents the gear-pattern diagram found on the real car.
Stage #6 builds up the front grille and bumper area. Oddly, only the lower half of the front grille uses profiled #71752 2x2 grille bricks, with the upper half left plain. The same part cannot be used above, due to space being needed for the opening of the front hood, though given this, it might have been better to have kept the lower half plain as well. A clever inclusion is that of a radiator fan, which is nearly hidden once built, but attaches to the rear of the front bumper assembly.

Stage #5
Stage #6
Stage #7 builds the top of the front fenders and the two opening doors. The new headlight elements here are excellent, and attach via their stud into the holes of the silver printed 2x2 round tiles, with the extended brim exactly covering the silver print to great effect. Sausage and banana elements complement the small fender parts forming vents on either side of the front grille, though they do look like two surprised faces which are very hard to unsee once seen. The doors utilize the new matching slope and arch elements to faithfully recreate the signature recessed white stripe which continues rearwards from the front wheel arches, although the curvature here is noticeably less than that on the real car.

Stage #7
Stage #8
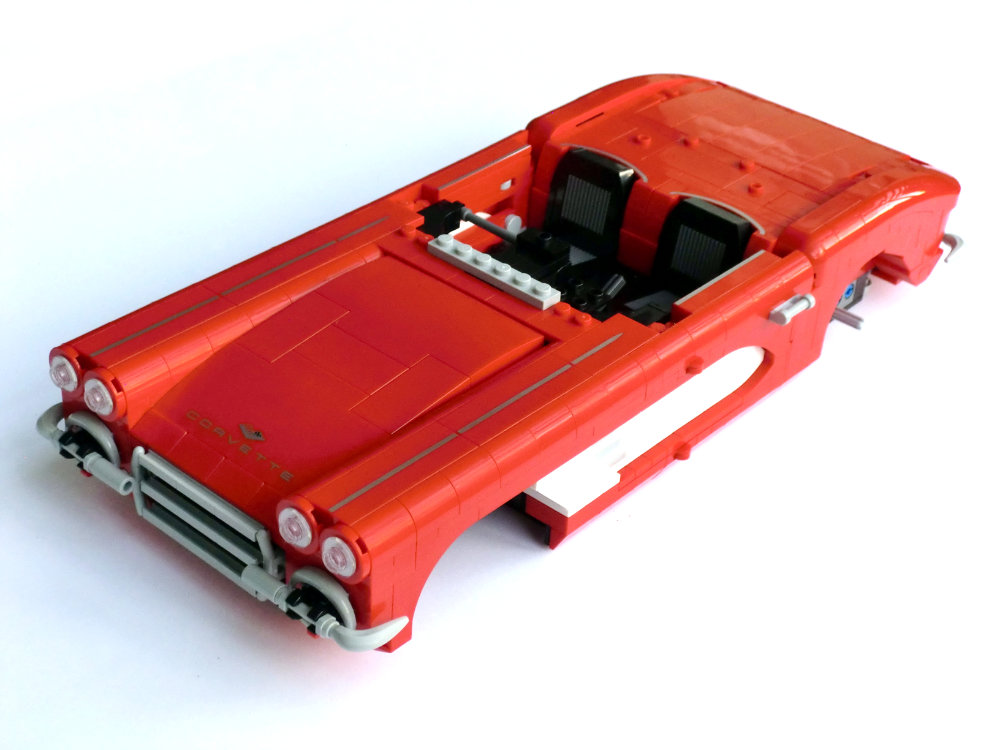
Stage #8 adds the seats, rear boot lid, engine, and front hood. The grey/black two-tone seats hinge backwards to slot nicely into the arched recesses, and the boot lid is hinged at two points for a seamless external finish. The flush closed position would make the boot hard to open, if not for the inclusion of a clever mechanism (mentioned earlier) which pops the lid slightly open from below. The engine itself features a good level of detail, built on a red base (the same color as the car, but apparently accurate for the engine block), with very nice drum-lacquered silver elements for the air filter on top, and a minifig cup serving as the oil filter. The front hood is also cleverly hinged for a seamless finish, although it doesn’t stay open very well.
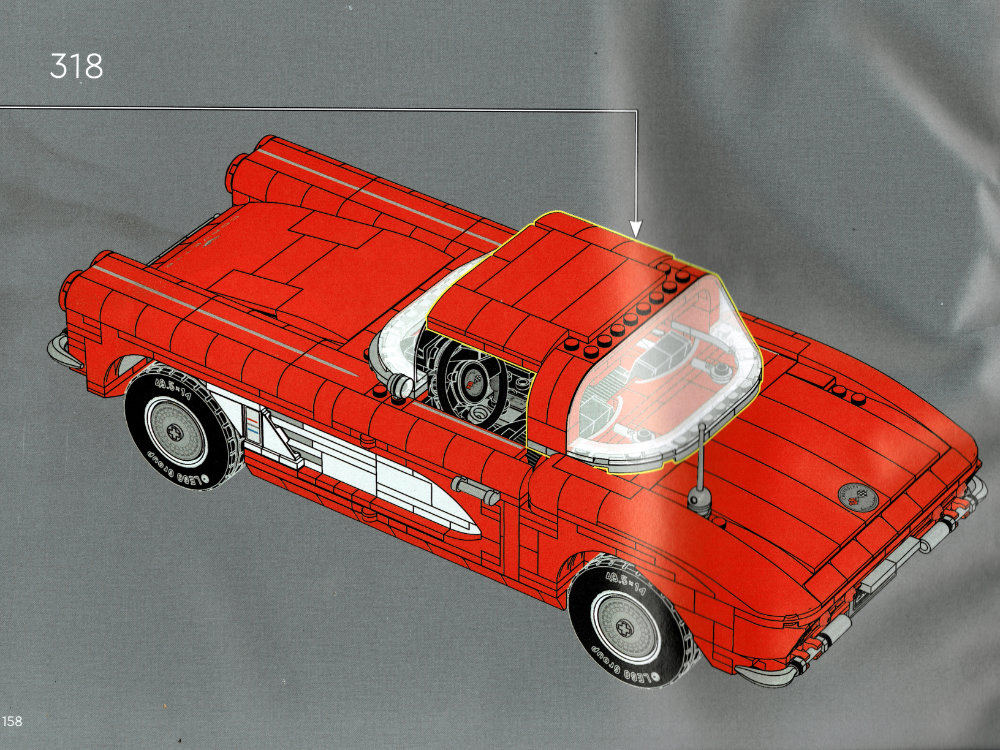
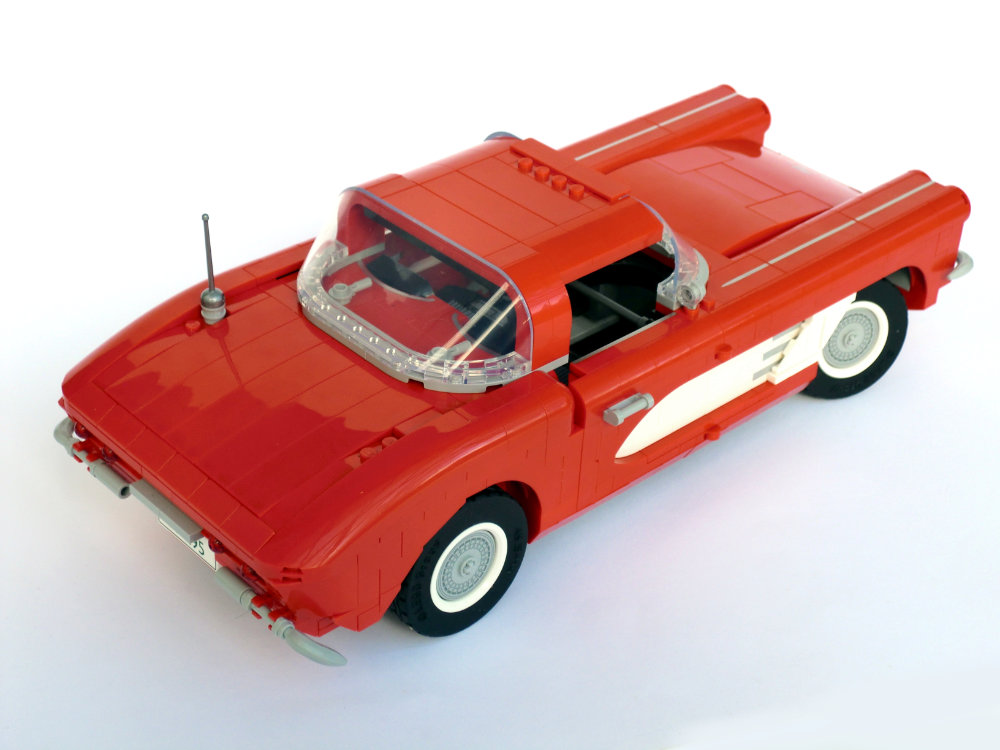
Stage #9 then completes the build, adding windscreen, wheels, and the optional hard-top. The front steering linkages are also added here, and as promised earlier are quite unique in that they connect (from the steering rack to the wheels) underneath the frame of the car. Presumably this was done to provide more space for the engine above. The hard-top though is the worst part of the set, and looks and feels like a rushed last-minute addition compared to the obvious care that has gone into the rest of the build. Given the near-studless finish of the main build, the row of 10 exposed studs at the back looks awful. In the comparison below you can see the official build on the left and a custom modified solution on the right (which lowers the roof by one stud and tiles everything up for a cleaner finish).
Official hard-top
Customized hard-top
Features & Functions
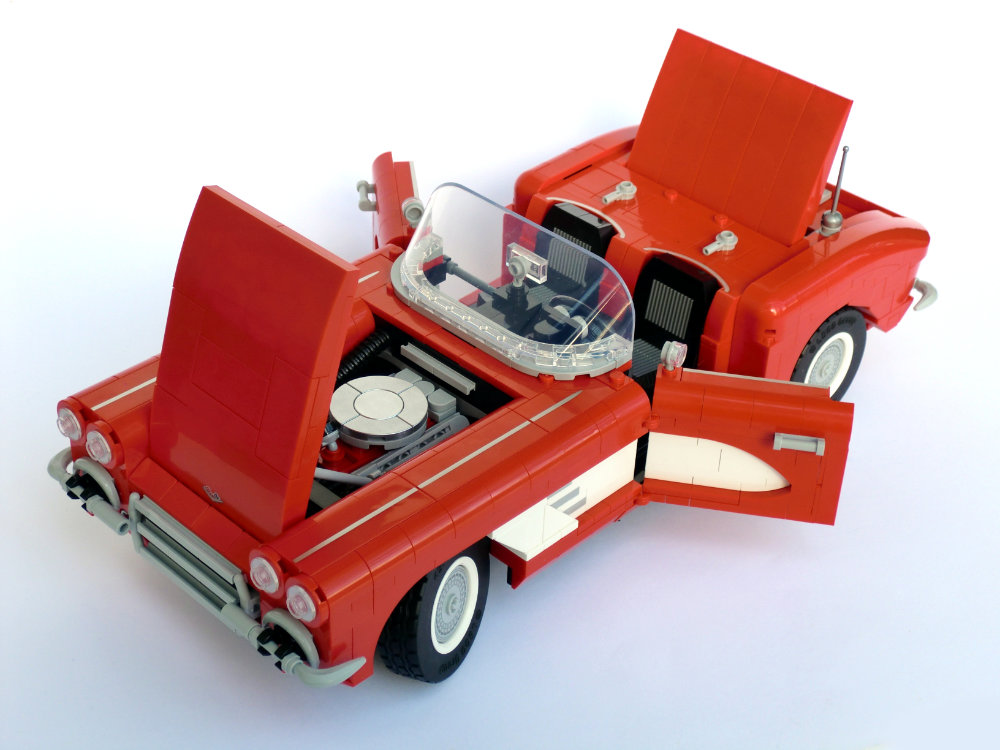
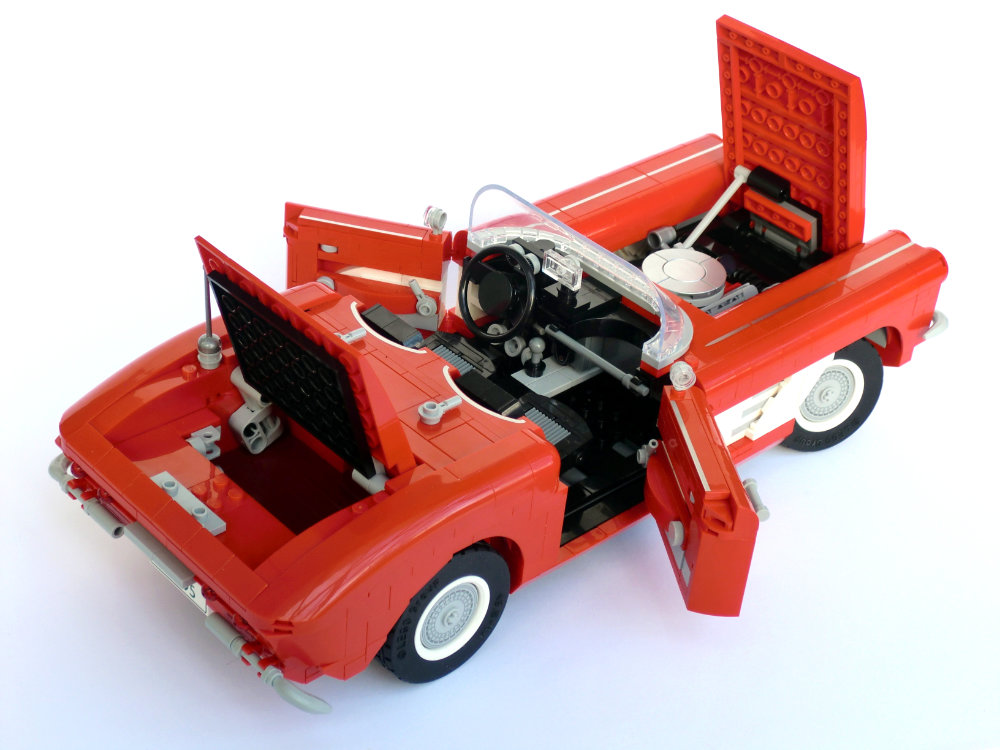
The completed C1 Corvette features working steering, opening front hood, rear boot, and doors, plus the optional hard-top. The steering works fine, and features the unique under-chassis linkages mentioned above, though the gearing used results in very little movement of the steering wheel at full travel. (It is possible to remove the travel limiters, but then the wheels move a bit too far and look odd.) The rear boot is great, and the doors function very well although there is no limiter to prevent them from opening beyond 90 degrees (not really necessary, but worth mentioning given that other sets have included this). As mentioned, the front hood has difficulty staying in place once opened, and would benefit greatly from a collapsing support strut as used in the recent Land Rover Defender set. (The picture above shows the addition of such a strut, which greatly eased photography.) The hard top is an excellent feature to have, but the design definitely begs for modification in order to look good enough to install. One further minor point to note is that the dash-mounted rearview mirror is rather fragile - adding a hollow-studded 1x1 round plate to the base helps, as does replacing the 1x2 trans-clear tile with a trans-clear jumper plate (if you have one).
Overall Impressions

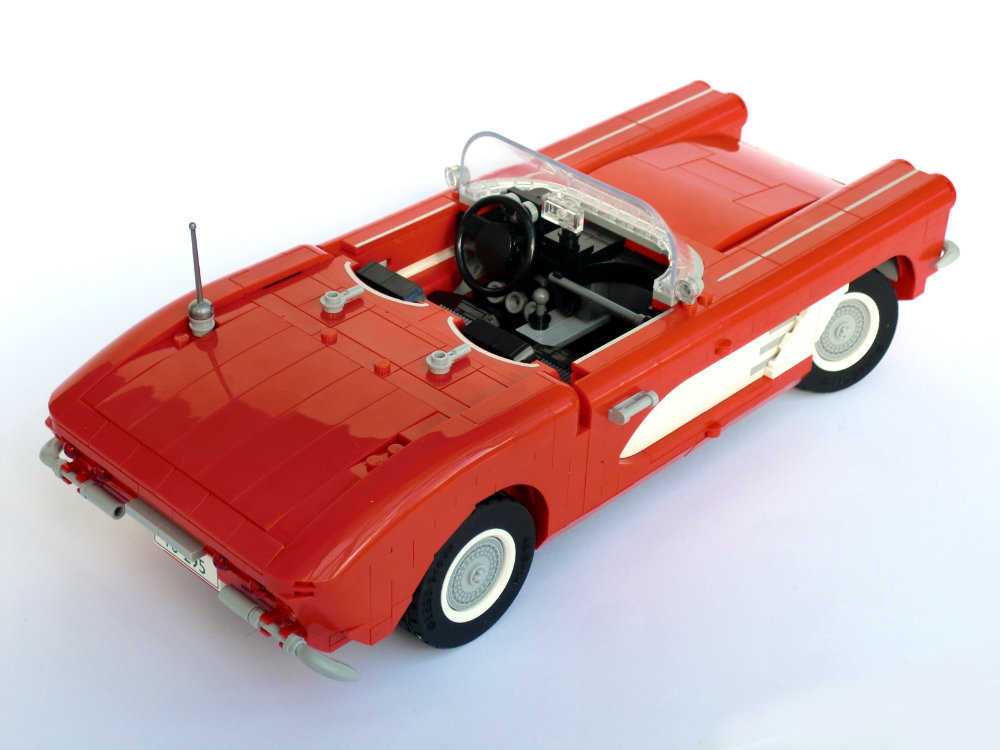
The real C1 Corvette is a subtly curved vehicle with lines that are not at all easy to capture and represent in Lego form. However, I think this set does it as well as could be reasonably expected given the medium, resulting in an impressively polished rendition of this iconic car. Full of advanced building techniques and several new parts and useful printed elements, the final model, while a little boxier than the real thing, looks really nice in person and should satisfy any collector. I must deduct points for the ‘unfinished’ hard-top, collapsing front hood, and stickered number plates, but these are not too hard to correct and everything else about the set is of a very high standard. For me personally, it doesn’t quite reach the heights of the Mustang, Porsche, or Defender, but is not far behind and is a solid step above others like the Fiat or Camaro. Of course your views may differ, but if you like the source material and can stomach the price tag, then I really doubt you’ll be disappointed with this set.
Final Summary
The Good…
- Protective packaging
- Striking and iconic colour scheme
- Great building techniques and build experience
- Useful new and printed parts
- Mostly good working functions
The Bad…
- Hard-top needs modification
- Front hood needs a support strut
- Stickered number plates
- High price
# We wish to thank LEGO for providing this set for review. The opinions in this review are not supported or endorsed by LEGO.
33592